April 27, 2012

Issue 55 - Finished.

The Final issue


There were three steps to finish this issue. First, I had to assemble and attach a tube to the back of the armour that would be used to hold a flag or standard. Next, there was a covered cord that I attached to the helmet. The ends hang down from the ears and it is used to tie the helmet to the head. Finally, as predicted, I attached the golden yellow crescent.

Despite working on three separate parts, it was very easy to finish this final issue. What took much longer was all the after completion final touches. I used a polishing cloth to remove the fingerprints and smudges from the metal plates. I cut the ends off cords and puffed them up to look nice. Several large sections of the armour came with a protective plastic film on them . I had been keeping it in place while I worked, but now it was finally time to peel it off.

I also took the armour out for a little trip to another house, this one is a bit larger than mine and it has a traditional Japanese style room. There I was able to set up my completed suit of armour and take a few photos with the additional display options I had purchased. I have decided to include some of those shots, instead of the usual close-ups of the work completed this issue, because this is the final issue and I think the work done here is not as interesting as the all the work put in to get here.

Now that the work is finished I feel a sense of melancholy at finishing this project. I had grown quite accustomed to the work and now that it's done I'm at a bit of a loss. However, despite the other emotions I feel at the end of such a long project, what I feel most is pride. I am very proud of the work I have put into this armour, and I am very proud of the result.

I am also not sure what to do next. I have been looking at the DeAGOSTINI website, but as of today I haven't seen anything upcoming that looks very appealing. Before I started this Samurai Armour I looked at a few other magazine projects, but I passed on those because they were not interesting to me. Perhaps it will be a some time before I find something else engaging enough to try again.

Although this may be the final part of the armour, it's not the end of my blog. Soon I will be attending Anime North and, if it's possible, I'll try to bring my armour with me and display it there. I think that might be a story worth a post or two.

I do sincerely hope you have enjoyed reading the story of my Making Samurai Armour and although the armour itself is done, the blog is not quite...


April 09, 2012

Display options

Once I received the box in late September I had all I needed to display the armour. However, sometimes the absolute minimum required is just not enough, and the people at DeAGOSTINI were thinking along the same lines. They had prepared a wide range display items, options, and accessories for the person who wants a little more:

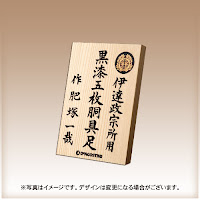
The simplest item was a hand painted wooden sign with the full name of the armour and it would be personally inscribed to include either the name of the person who assembled it, or the name of the person it was made for.
This next item I called the aquarium. It is an enclosed glass case to hold the full suit of armour if you wished to keep it permanently on display, while keeping dust and fingerprints off. I don't have enough room to keep the armour up all year so I didn't really consider this option. Although I still think the black and gold case looks nice.


If you wanted something a little smaller, and at a lower price, you could select this simple display stand. It gives your box something a little classy to rest upon and helps to make your armour stand out where you choose to display it. This is not a significant display item on it's own, but you could also purchases an accessory or two to accent it.

 Perhaps something like standing display? This black wooden screen has images of a one eyed dragon on it. I must admit this was a tempting purchases for me, The monochromatic art is not superb, yet I like it. I also think with a simple display stand, and the actual Samurai Armour, the total impact can be quite a bit better then the individual parts. On the downside, it is quite large and although it folds, I don't really have a place to put it when not on display.

I also considered a scroll. These would conveniently roll up when not in use. They had two options to choose from, one with the white crest, and the other only had a large golden circle. I did prefer the crest a little more than the golden circle. Although, if they offered one with a golden crest the choice would be obvious.

Finally what good is a suit of armour without a weapon? They offered a very nice replica of Date Masamune's Katana and I was sorely tempted to purchases it. However there was one drawback, it's full size.

Normally that wouldn't be a problem, but I have made a 1/2 scale suit of armour, and placing a full size sword next to it would look out of place. The sword appears too big while the armour too small. They don't look like they belong together. I really wanted to get the sword, but the mismatched size was pushing me away.

Finally was the most outrageous items DeAGOSTINI had for sale. A 1/2 scale replica of Date Masamune himself. He could wear the armour, rather then display it on a stand and empty box. There were a few conditions to consider before ordering it: First the minimum order was 30 pieces, so I had to believe that at least twenty nine other people would also want to keep a mini-Masamune in their homes. There was also the price. This extra large doll would cost a little more then the complete suit of armour he would wear!


After carefully considering my budget and display options I made my decision. What, if any, did I purchases? You'll just have to wait and see...

April 07, 2012

Mysteries Solved.

As we approach the final issue I should answer what happened at the end of September.

In brief: my box arrived about a week later and I didn't have to cut my magazines. I think it's because I was on the subscription service that I automatically received the box. The colour is a little darker then the image online showed and the clasp is a little thinner then I expected, but I am very happy with it.

The box is more than a convenient place to store my armour, it also used to display it. Issues 12 and 13 contained the wooden display stand that holds the torso section, sleeves, mask, and the helmet. That stand is designed to sit on top of this box while the thigh guards are warped around and the shin guards are placed in front to complete the presentation.


You might think that should be enough to display the armour. Fortunately, the good people at DeAGOSTINI would disagree. Last November they offered several additional options and accessories to enhance and expand the Samurai Armour display.

April 06, 2012

Issue 54

This is the penultimate issue, and it was a big one. The work here was a mirror copy of issue 51; and, although I had done it all before, it was still a time consuming challenge. However, because of my experience with issue 51 I was able to make a few minor alterations to how I did the work this time.

First, I made sure to not secure all the parts together so tightly. They were not loose, but there was a little slack left in. This was important because when the shin guard is closed the parts tighten together a bit without being under high tension. I also knew how the plates should overlap and this helped to keep everything in the right place. Finally, when making the tip of the silk string, I used less glue and I cut the point a little longer then before. This allowed me to make a narrower and longer tip and that was easier to thread through the leather and silk sections.

The rest of the work was the same as before. I first attached the armoured plates to the silk and leather with string. Then I sealed and attached the straps. Next I glued the backing in place, and finally I stitched the whole thing together. There was one minor difference between this issue and issue 51, the texture of the leather section. They are both black leather, but they don't look the same. I'm not a leather expert so I can't say why this is, but I wonder if there is a technical explanation, or if that's normal when working with natural materials.

Next time will be the last issue. The Final issue. The whole project is almost over, but first I have a few loose ends to tie up...


April 03, 2012

Issue 53

This issue was unsurprisingly simple. I used some of the leftover silk string from the previous issue to join the two new plates together, and then to join all the plate sets together.

For the next issue I'll be attaching this to another leather and silk backing. I am not really looking forward to it, but the whole project is almost done and that's keeping me going.

April 02, 2012

Pre Fifty Three.

I took a few photos of the unboxing of the parts in issue 53 so you could get a better understanding of what each issue looks like before I start to work on it.

The subscription service would deliver me two issues every other week, usually on Sunday morning. I'd receive them together, wrapped in a green plastic bag. Within this I'd find each issue in separate identically sized packages. The outside is one piece of card printed to look like the cover of the magazine and shaped like an open box. In this are all the parts of the issue sitting in a plastic tray that is also enclosed under a plastic lid that is sealed down to another plain sheet of cardboard. Finally the magazine is placed on top and the whole package is held together with shrink wrap.